
Today we’re going to set up Minecraft on a $170 Chromebook: it’s the cheapest way I’ve found to get my kids up and running with the Java edition of Minecraft. Given that Chromebooks run ChromeOS, how to get this done is not immediately obvious, and we do need to make some tweaks to get the game to perform sufficiently.
If you’re willing to spend more money, this $260 Chromebook will perform a bit better. If you want to spend even more, look for a beefier CPU and more memory, as those will be the primary bottlenecks for running Minecraft.
We will be using a combination of Chrome’s Developer mode, a special OS environment configurator called crouton, Ubuntu, the XFCE window manager, Java, Minecraft itself, and a graphics optimizer called Optifine.
Enable Developer Mode
(Note: if you’re viewing this on the same device on which you’ll be performing the steps, then you may want to write the steps on a scratchpad.)
First, we’ll boot the Chromebook in Recovery Mode by holding down the Esc and Refresh (F3) keys and then tap the Power key.
Your machine will reboot, and you will be presented with a recovery screen. Press Ctrl-D.

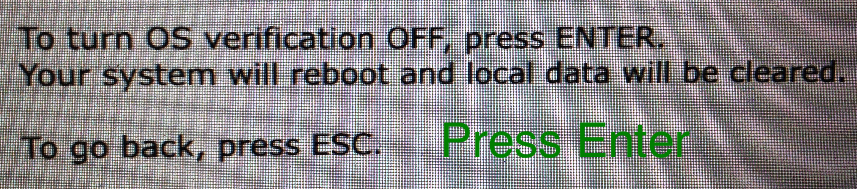
You’ll then be asked if you’d like to turn off OS Verification. Press Enter.
The Chromebook will then go through its installation process, which will likely take a few minutes. Note: when you reboot (and every time you boot), you’ll be told that OS Verification is off and that you can press the spacebar to re-enable it. Do not press Space.
Note that from now on when you boot your Chromebook, you’ll see the following message: OS verification is OFF... Press SPACE to re-enable. Do not press the space bar, as it will undo everything we’re setting up.
Install Crouton
Crouton will help us by creating an Ubuntu environment within our Chromebook. This will not alter the behavior of ChromeOS; Ubuntu will run alongside it.
Download crouton here. Then press Ctrl-Alt-T to open up a terminal window, run the shell command to open up a shell, and then run sudo sh ~/Downloads/crouton -t xfce to kick off the installer. Go grab a cup of coffee and the Sunday paper; this part will take a bit.
The installer will eventually ask you to specify a username - let’s go with admin. Then pick a good password.
The installer should then drop you back into the shell. Run sudo startxfce4 to fire up the Linux window manager.
Install Minecraft
Using the Web Browser (the icon that looks like a blue globe at the botton of your screen), visit minecraft.net/en-us/download/alternative/ and download the Ubuntu Linux version of Minecraft. The filename should be Minecraft.deb.
Next, open up the Terminal application (again, at the bottom of your screen in the dock). Run sudo dpkg -i ~/Minecraft.deb. You will likely see an error regarding some dependencies - to address these, run sudo apt-get -f install.
Install Optifine
To install Optifine, Minecraft needs to have been fully loaded up with the latest version at least once, so we’ll do that now.
Run minecraft-launcher to open up Minecraft. Log in using your Minecraft credentials. Open up the game by pressing Play. The first time the game loads up, it can take a while. Also: don’t be discouraged if you see some errors show up in the terminal - just let it do its thing. Once the game is open, close out of it.
Visit Optifine.net, download the latest version of it, and follow the installation instructions.
Running Minecraft
Taking it from the top: from your Chrome interface, enter Linux by opening up a terminal window and pressing Ctrl+Alt+T, run shell, and then run sudo startxfce4. Once that’s loaded, open up a Terminal window and run minecraft-launcher.